OpenBSD
Absolute OpenBSD 2nd Edition is here!!!
by Brian on May.20, 2013, under Computer Stuff, OpenBSD

Michael Lucas has done it again. In documenting arguably one of the driest topics on the planet, Mr. Lucas manages to add fun, trivia, and extremely useful knowledge of the OpenBSD team’s latest OS offering to an already excellent book. I read the first one 10 years ago or so, and this one is even better. The updated information on ProPolice, W^X, and the new PF features makes this book a no-brainer for *any* UNIX admin looking to add some extra security to his network, as well as a hobbyist who may be thinking of learning the ways of the shell.
As far as I’m concerned, chapters 21 and 22 were well worth the purchase price alone. If ANY member of the Princeton Area OpenBSD User’s Group would like to read this book, let me know, and I can get you a copy. My only request is that you post what you think of the book on this thread, so the fine folks at No Starch Press can see it, as they were kind enough to get us this advanced copy!
Mr. Lucas has auctioned the first (signed) copy to directly benefit the OpenBSD Project! Take a look here:
http://blather.michaelwlucas.com/archives/1646
The URL for the auction was here:
http://www.ebay.com/itm/Absolute-OpenBSD-2nd-Ed-by-Michael-Lucas-Special-signed-first-copy-printed-/200913454300?
HUGE thanks goes to Jessica Miller of No Starch Press for supplying us with an advanced copy! Thank You! It was a great book! :)
DMARC/DKIM is coming. You're all gonna have to learn about encryption.
by Brian on Apr.15, 2012, under Computer Stuff, Linux, Mac OSX, Networking, OpenBSD, Windows Info
HAHAHAHAHAHAHA
Told ya.
Here it comes, check this out. If you work in the technology field, you need to read this:
http://dmarc.org/
Just installed Virtualbox 4.0 on Ubuntu 10.10
by Brian on Feb.19, 2011, under Linux, Mac OSX, Networking, OpenBSD, Windows Info
1 Comment more...
Any interest in an OpenBSD how-to?
by Brian on Dec.06, 2008, under OpenBSD
I started writing an OpenBSD how-to regarding an all-in-one appliance solution some time ago.. (around the 3.4-RELEASE)
It started to seem really redundant, as OpenBSD is so thoroughly documented.
Is there any interest in seeing something like that?
I was thinking of something that could be used as your firewall, mail server, web server, as well as a VPN/DNS/DHCP/SSH/SFTP/FTP server.
We’ll set it up wiki-style, allowing edits.
So, any takers? Those asking questions and offering feedback will be encouraged to post…
OpenBSD pf and Voice over IP
by Brian on Feb.08, 2006, under OpenBSD
Background
In a typical home network, a NAT device hides a number of internal devices behind a single globally addressable IP address within the network provider’s IP space. While VOIP is readily available to end consumers via the SIP protocol, SIP isn’t directly usable behind a NAT device.
Most VOIP providers utilize what is called a “media proxy”, a set of servers that exist to assist with this issue by redirecting media streams from consumers to the VOIP provider’s SIP servers. This workaround introduces two problems: The media proxies need to have ample bandwidth and low latency, but also end up disallowing more than one SIP device per customer IP address.
To allow for a home network based multi-line multi-device SIP setup, media proxy use is not possible. Instead, the home network NAT device should be configured to redirect SIP control and media streams to the appropriate IP phones within the home network. Packet filter from OpenBSD can fulfill that role. You could also run a local PBX or SIP router, but that solution adds moving parts and is beyond the scope of this note.
Phone configuration
This configuration has been tested with the Cisco 7960 phone.
Do not use NAT proxy or outbound_proxy. Define each call appearance with its distinct SIP proxy information, and the same control port of 5060/udp can be used for all. The STUN phone feature should be enabled, although some commercial SIP proxies can function without it.
pf Configuration
pf(4) uses /etc/pf.conf as its configuration file. Here is a basic subset of a ruleset that also uses ALTQ to guarantee bandwidth to the voice uplink, since upload bandwidth is usually restricted.
While packet queueing is not always necessary, the occasional voice quality degradation associated with link bandwidth being unavailable is undesirable. It is a very useful capability to have at your disposal and allows for reliable, superior to PSTN voice quality.
# Return error codes for ports that are blocked. Allows faster error recovery

set block-policy return
# udp session timeout should be equal to or larger than your smallest SIP registration
# timer timeout. For a typical SIP timeout of 300 seconds, this should suffice.
set timeout { udp.first 300, udp.single 150, udp.multiple 900 }
# definitions
int_if = "fxp0"
ext_if = "fxp1"
int_net = "192.168.1.0/24"
ipphone1 = "192.168.1.18"
ipphone2 = "192.168.1.19"
# enable CBQ queueing on the external interface. Define 3 queues
altq on $ext_if cbq bandwidth 1000Kb queue { q_voice, q_pri, q_std }
queue q_voice bandwidth 192Kb priority 7 cbq(borrow)
queue q_pri bandwidth 50% priority 6 cbq(borrow)
queue q_std bandwidth 80% priority 1 cbq(default borrow)
# One translation line per IP phone. static-port is necessary to make pf retain the UDP
# ephemeral port, so that the remote SIP proxy knows what session we belong to
nat on $ext_if proto udp from $ipphone1 to any -> ($ext_if) static-port
nat on $ext_if proto udp from $ipphone2 to any -> ($ext_if) static-port
# Generic NAT rule for all internal network devices
nat on $ext_if from $int_net to any -> ($ext_if)
# Allow external SIP control traffic
pass in quick on $ext_if proto udp from any to any port 5060 keep state
# Allow media traffic, place in voice queue (guaranteed b/w)
# This assumes standard media stream configuration with a Cisco IP phone. Modify as
# necessary.
pass out quick on $ext_if proto udp from $ext_if to any port 16384:32768
tos 0xb8 queue q_voice keep state
# Outgoing traffic creates state entries
pass out quick on $ext_if proto { tcp, udp, icmp } all keep state
block in log all
Troubleshooting and verification
To verify that the implementation works as expected, a media stream should be setup from the internal network, NATted and forwarded to the external SIP gateway. Source and destination ports for control traffic (destination port 5060) and media traffic (varies) should remain unchanged by the gateway. Now, your phones should work
To verify correct packet prioritization, saturate the uplink with a large upload and attempt to use the IP phone at the same time. The IP phone traffic should get mapped to the high priority queue and voice quality should be good at the remote end. Because of ample download bandwidth, queueing is usually not needed and regular packet forwarding is sufficient.
- Check status of queues: pfctl -s queue -v
- Flush state table: pfctl -F state (queue tagging persists with state entries)
- Check firewall rule hit count: pfctl -s rules -v
OpenSSL certificate conversion PKCS#12 PEM
by Brian on Feb.04, 2006, under OpenBSD
Convert a certificate from PEM format (.pem) to PKCS12 format (.p12)
To use a certificate for authentication or for encryption/decryption, you have to import it into your program’s certificate manager. The program could be a web browser, email client, or even something like a hard-coded encryption/decryption routine run from a script. Different programs, browsers, and mail clients require this certificate in differing formats. At some point, you will need to convert a certificate, unles you *love* spending all of your extra cash on commercial certificates.
Here’s the openssl command to convert your certificate from a PEM format to a PKCS12 format:
$ openssl pkcs12 -export

-out <em>file_name.p12</em>

-name "<em>My certificate</em>"

-inkey ~/.ssl/userkey.pem

-in ~/.ssl/usercert.pem
## Options Explanation ##
-out : The filename of your new certificate file in PKCS12 format.
-name : An arbitrary text name to differentiate this certificate from others.
-inkey : The path and the name of the file containing your private key
-in : The path and the name of the file containing your certificate.
Convert a certificate from PKCS12 format (.p12) to PEM format (.pem)
- To export just your private key to ~/.ssl/userkey.pem…
$ openssl pkcs12 -nocerts -in cert.p12 -out ~/.ssl/userkey.pem
- To export only your certificate to ~/.ssl/usercert.pem…
$ openssl pkcs12 -clcerts -nokeys -in cert.p12 -out ~/.ssl/usercert.pem
-in cert.p12 : the path and filename of your certificate in PKCS12 format.
Change the passphrase of the private key
$ openssl rsa -in ~/.ssl/userkey.pem -des3
Where ~/.ssl/userkey.pem is your private key
The openssl command will prompt for:
1. your old password
2. your new password
3. verification of your new password
Installing an OpenBSD VirtualPC on a Mac
by Brian on Jan.22, 2006, under Mac OSX, OpenBSD
The following directions are for OpenBSD and Virtual PC on the Macintosh, and assume familiarity with the installation and use of both. Note that if you have OpenBSD CDs, you may boot off the i386 CD to perform the installation. Please refer to either the OpenBSD/i386 installation documentation or the Virtual PC documentation in case of questions, as documenting the installation of either is beyond the scope of this document.
- Grab(buy) the latest OpenBSD release. (there’s a link on the Links page)
- Create a Virtual PC hard disk image file of the size you want your OpenBSD hard disk to be, at least a gigabyte if you want to unpack the source tree and have a usable system. However, you can get away with a hard disk as small as 300MB or so for a complete installation.
- Change the VirtualPC partition to use a fixed file size on your local disk. You *CANNOT* use a dynamically re-sizable partition. The only drawback to this is that a 10gb partition takes up 10gb, even if most of it is empty space. OpenBSD does not like dynamically resizing partitions, and installing OpenBSD on one of these will hang while extracting base3x.tgz. (or it will hang on misc3x.tgz if it makes it through base3x.tgz)
- Capture your OpenBSD CD or the cd38.iso image to the VirtualPC’s cdrom drive.
- Start up the VirtualPC, and boot to the captured CD image.
- Perform OpenBSD install as usual.
- Shut down the virtual machine with halt… Welcome to OpenBSD: The proactively secure Unix-like operating system.
Using Multiple Pre-Shared Keys with OpenBSD ISAKMPD
by Brian on Jan.02, 2006, under OpenBSD
Having an Open Source IPSec VPN into the office is nifty. It usually also means others will want to appreciate it’s niftiness… (and use your bandwidth to check their Exchange calendars). So, do you want 30 or so other users out there with their perpetually un-locked, spyware and virus-vulnerable XtraPenetrable laptops, holding the only pre-shared key to your VPN? Of course not. (you really don’t). So, implement one pre-shared key per user, or one key per group, depending on your policy of access revocation.
We really like OpenBSD around here, and may sound like men with a hammer thinking everything is a nail, but it really does do *everything* well as far as we use it. So here’s the setup.
First, you must create the config files for ISAKMPD.
$ sudo touch /etc/isakmpd/isakmpd.conf

$ sudo touch /etc/isakmpd/isakmpd.policy
Then, turn on the AH and ESP protocols by editing the /etc/sysctl.conf.
net.inet.esp.enable=1           # 0=Disable the ESP IPsec protocol

net.inet.ah.enable=1            # 0=Disable the AH IPsec protocol
Or, just do it from the shell-
$ sudo su

# sysctl -w net.inet.esp.enable=1

# sysctl -w net.inet.ah.enable=1
Now, we’ll set up a basic road-warrior configuration in /etc/isakmpd/isakmpd.conf .
Here’s an example.
Next, we’ll set up the multiple pre-shared keys in the policy file.
Here’s another example.
After we edit these files, you’ll need to change the permissions on them.
$ sudo su

# chmod 0500 /etc/isakmpd/isakmpd.conf /etc/isakmpd/isakmpd.policy
Now allow the VPN traffic through your packet filter-
Here’s another example.
Apply the new packet filter configuration:
# pfctl -f /etc/pf.conf -F all -d -e
Fire up ISAKMPD in debug mode so you can see any incoming connections
$ sudo su

# isakmpd -d -DA=75
Once your road-warrior connects successfully, kill the debug mode ISAKMPD and start it in normal daemon mode.
$ sudo su

# pkill -9 isakmpd && isakmpd
Now, connect a road-warrior machine to the outside of your firewall, and check for your security associations.
$ sudo su

# ipsecadm show
If you have a valid VPN connection, you should see something like this:
sadb_dump: satype esp vers 2 len 40 seq 0 pid 0
sa: spi 0x80655c1b auth hmac-sha1 enc 3des-cbc
state larval replay 0 flags 4
lifetime_cur: alloc 0 bytes 0 add 1136234418 first 0
lifetime_soft: alloc 0 bytes 0 add 0 first 0
lifetime_hard: alloc 0 bytes 0 add 28800 first 0
address_src: 192.168.245.2
address_dst: 192.168.209.2
identity_src: type prefix id 0: 192.168.245.2/32
identity_dst: type prefix id 0: 192.168.209.2/32
key_auth: bits 160: 9dfde94cd9708d6a995a4d238
key_encrypt: bits 192: 3bc2f3f7f0fbce8a12ae73966c5
sadb_dump: satype esp vers 2 len 40 seq 0 pid 0
sa: spi 0x895dcf4b auth hmac-sha1 enc 3des-cbc
state larval replay 0 flags 4
lifetime_cur: alloc 0 bytes 0 add 1136261627 first 0
lifetime_soft: alloc 0 bytes 0 add 25920 first 0
lifetime_hard: alloc 0 bytes 0 add 28800 first 0
addres_src: 192.168.245.2
addres_dst: 192.168.209.2
identity_src: type prefix id 0: 192.168.245.2/32
identity_dst: type prefix id 0: 192.168.209.2/32
key_auth: bits 160: 9d8c52703983b1497b655a9
key_encrypt: bits 192: 39875c4b8fd77ec740f37da27d
You can also check the VPN connections with netstat-
 $ sudo su

# netstat -rn
Should output something like this-
Encap:

Source             Port  Destination        Port  Proto SA(Address/Proto/Type/Direction)

192.168.0/24      0     192.168.10/24       0     0     192.168.245.2/50/use/in

192.168.10/24       0     192.168.0/24       0     0     192.168.209.2/50/require/out
I realise this is short, (I wasn’t paid to write this book) ;) so please feel free to post any questions or comments.
Snort Reports with SnortALog
by Brian on Dec.27, 2005, under Networking, OpenBSD
SnortALog v2.4.0 is a really nice Snort logfile reader/parser/perl script written by Jeremy Chartier. Thank you Jeremy! It’s an *incredible* piece of work! Get a copy from his website. I installed mine on OpenBSD-3.8-STABLE, but I also needed the p5-GD-Graph package from the ports tree.
 $ cd /usr/ports/graphics/p5-GD-Graph

$ sudo make install
Then, I made the script to run SnortALog, and set it to run from root’s crontab.
Here’s a screenshot of the HTML output.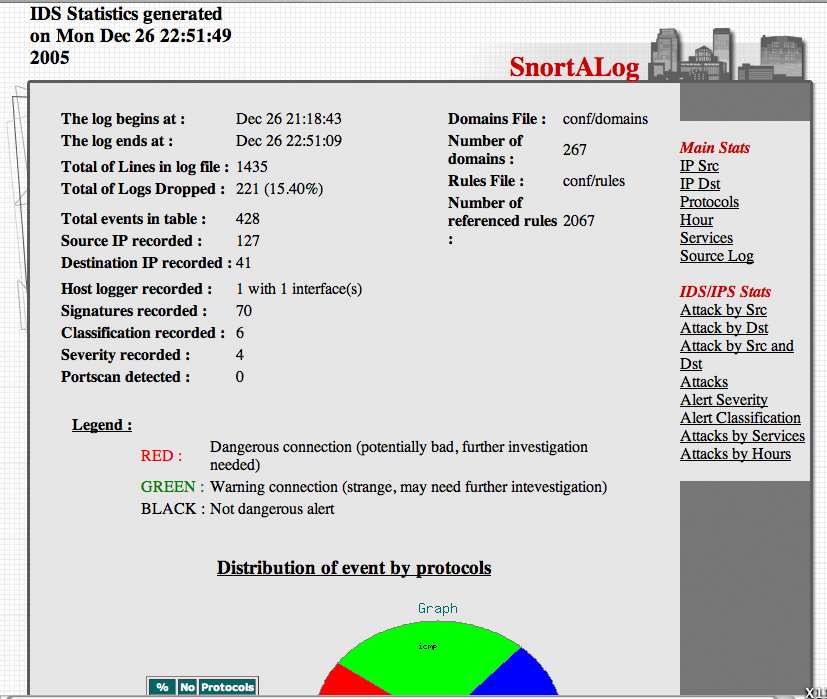
Graphing packet traffic with pf & pfstat
by Brian on Dec.21, 2005, under Networking, OpenBSD
Getting a good visual representation of your network traffic has never been easier. We use OpenBSD for most of our firewalling applications, and for VoIP/VPN solutions. As a result, we (as well as our customers) need to closely track the bandwidth utilization of some of the endpoints for quality of (VoIP) service reasons. RRDTool and MRTG are both very excellent tools, but what to do when snmp is not an option? Pfstat, available in the OpenBSD ports tree, solves this problem, and is *considerably* easier to install and configure.
First, install pfstat.
$ cd /usr/ports/net/pfstat

$ sudo make install
Now, set it up.
you need to create a few files first.
$ sudo touch /var/log/pfstat

$ sudo touch /etc/pfstat.conf
Now, set up the /etc/pfstat.conf file you just created.
$ sudo vi /etc/pfstat.conf
Here’s an example pfstat.conf I found on benzedrine.cx, (the homepage of the author of pf & pfstat) and modified just slightly.
Thank you, Mr. Hartmeier. Your work is amazing.
Speaking of Pf, we need to edit the packet filter configuration, to set the log interfaces.
$ sudo vi /etc/pf.conf
Now, find your interface names. (Mine are $ext_if=rl0 and $int_if=fxp0)
So, I added the following lines to the /etc/pf.conf
set loginterface rl0(It has been pointed out that this is incorrect.
set loginterface fxp0
The last interface listed is the one that will get used. Thanks, Jon.)
Fetch the new packet filter configuration:
$ sudo pfctl -f /etc/pf.conf
Now, edit root’s crontab to run pfstat and update your graphs.
 $ sudo su

# crontab -e -u root
and add the following two lines to it:
* * * * * /usr/local/bin/pfstat -q >>/var/log/pfstat

*/5 * * * * /usr/local/bin/pfstat -c /etc/pfstat.conf -d /var/log/pfstat >/dev/null
Hold “Shift” and hit “ZZ” to save and exit root’s crontab.
To force the creation of the graph images, run this:
$ sudo /usr/local/bin/pfstat -q >>/var/log/pfstat

$ sudo /usr/local/bin/pfstat -c /etc/pfstat.conf -d /var/log/pfstat >/dev/null
Now, you just need an HTML document to display your nifty new graphs.
Here’s the one I use.
Save it to /var/www/htdocs/traffic_stats.html, and start up apache:
$ sudo apachectl start
and check out your traffic:
http://your.web.server/traffic_stats.html
.
