Networking
Who's got the fastest bandwidth in your neighborhood?
by Brian on Feb.17, 2011, under Amusement, Networking
Find out with The National Broadband Map
“I can see the fiber, I just can’t get them to bring it here…” ;)
The entire IPv4 address space is exhausted.
by Brian on Feb.17, 2011, under Computer Stuff, Networking
Are you ready for IPv6? You’d better be, because there’s no UNALLOCATED space left in the IANA pool for IPv4.
Anyone out there running IPv6 in production yet? I’ve been running it internally for a while now, but haven’t made the leap to the external interfaces yet. Benefits? Problems? anyone?
Linux as a Windows domain member server
by Brian on Sep.06, 2010, under Linux, Networking
I’m not going to try to write a how-to on this, but suffice to say that it finally works!
I configured Samba3, PAM, and Kerberos on Ubuntu 9.10, and I can share folders to Windows client workstations using their existing authentication to the domain controller. I can even set ACLs that seem to be obeyed, and use Windows group membership to determine access rights.
Here are some links with relevant information:
The Samba WIKI (geared towards RHEL, but still helpful.)
How To Integrate Samba Using Active Directory For Authentication (geared towards Gentoo linux, but still helpful)
Ubuntu Samba info
I’ll certainly try to answer any questions you’ve got, just post ’em.
We've got Emulex NetQue03 manuals!
by Brian on Feb.21, 2010, under Networking
The manuals are attached to the original post here->
https://cryptednets.org/?p=137
Thanks for emailing them, Robert!
Using your DNS server as a spyware detector
by Brian on Mar.07, 2009, under Networking, Windows Info
Recently, I needed to determine which local LAN hosts were infected with spyware on a network of Windows XP computers. This network is a single Active Directory Forest, with a single ‘domain.local’ domain name.
In the absence of any anti-spyware management tools, I decided to use the DNS server on the domain controller to help me determine which workstations were infected.
First, I changed the outbound forwarder servers to use OpenDNS. OpenDNS is a free recursive DNS service that you can use to resolve all DNS queries on the Internet safely. The reason for this is that the OpenDNS servers will re-direct your infected machine’s traffic away from known botnets and known distribution points for spyware to their own, essentially cutting off an infected workstation’s access from known “bad guys”.
Usually, when I implement the OpenDNS service on a LAN, I notice an *INSTANT* improvement in available bandwidth.. Try it for yourself. More info here: www.opendns.org
Next, you need to clear the cache on your DNS server. To do this, open DNS Management in your MMC, right-click the server, and click “Clear cache”. Now, click “View”, and “Advanced” in the MMC’s menu, and you can now view the cache.
Right-click the server again, and click “Properties”.
On the “Logging” tab, turn on “Debug Logging”, note or set the location of the log to be written.
Now, right-click the server, and click “All Tasks” -> “Restart” to restart the DNS service.
Since most spyware infected hosts need to phone home on a regular basis, you can now just watch the cache for incriminating lookups, and read the DNS debug log for the IP address of the offending hosts.
Anyway, it worked for me, and I was able to identify the 3 hosts on the LAN that had spyware infections, in about 10 mins… (without staring at a protocol analyzer…)
Note: Do not forget to turn the DNS debug logging off again when you are finished. This logfile will grow *very* quickly, and become difficult to open or manage within hours on a busy LAN.
The Russian Federation CIDR blocks are now allowed access to CryptedNets.org
by Brian on Feb.22, 2009, under General Info, Networking
Sorry for the drastic measure, but I’ve only got about 1mb up and 1mb down, and I hate to be used by anyone as a DDoS reflector. My DNS server no longer allows queries for the root nameservers, (thx again, Kiter) and the block list has been cleared. The entire world may now freely access this site, though I’m not sure what for, save for some comic relief, and sparsely located golden nuggets of networking knowledge.
If you *do* happen to be reading this, just drop a comment to say “hey”.
You don’t even need to register…
It won’t hurt a bit…
Just in case you ever run across an Emulex NetQue NQ03…
by Brian on May.04, 2008, under Networking
Thanks to Robert, this post is now new and improved! We’ve got Emulex NetQue03 manuals!
1. The NetQue Command Reference
2. The NetQue User Manual
3. The NetQue Windows NT Installation Guide
ALSO- It appears that we happen to have a perfectly functional Emulex NetQue03 Print Server for sale. If you need one, let me know, and I’ll put you in touch with the owner.
I had to change the default gateway on an Emulex NetQue NQ03 print server last Friday. Thankfully, the default root password was still in place. After logging in via telnet, I realised that I had no idea how to change it. I threw a few *NIX commands at it, and it responded either: Invalid command or Ambiguous command. (or something to that effect..) I’m not sure what OS this thing runs, but it didn’t like *anything* I threw at it. As I am not one to leave a piece of equipment malfunctioning, I *had* to figure this one out.
In any case, here’s what I now know. There is not a manual for this device to be found anywhere online. Emulex doesn’t even *mention* this device on their site in the “legacy products” section. So, log in via telnet. If you’re lucky, the default user account is username ‘admin’ with a blank password. You’ll get to a single shell prompt. (looks like this: > ) Then, to enter priveleged mode, type ‘su’, and hit enter. The default root password for the NQ03 is ‘system’. If you are successful, you’ll see a double shell prompt. (looks like this: >> )
The commands you need to change the default gateway are here:
Enter Username: admin
Enter Password: <enter>
> su
Enter Password: system <enter>
>> change node IP 111.222.333.444 gateway default <enter>
>> sync <enter>
>> sync <enter>
>> init delay 0 <enter>
This will drop your connection and reboot the device immediately. When it comes back, you can log in and issue the ‘show config’ command to verify that the gateway was successfully changed.
NOTE: Emulex has END-OF-LIFED all printer servers (NETJet, NETQue, NETQue Mate, NETQue Pocket, NETQue Pro2, NETQue Token), terminal/communications servers (P2500 series, P3000, P4000, P6000, P8000), remote access servers (ConnectPlus LT and Pro), and WAN adapters (XP, MPC, and DCP series) in the year 2000. No further software nor hardware updates will be provided. Manufacturing has ceased on these products. No new models will replace these products. Support and repair will remain available as a best effort. Emulex is focusing exclusively on Fibre Channel and Network Attached Storage (NAS) connectivity.
Configuring a Cisco PIX 501
by Brian on Jun.28, 2007, under Networking
If you’re using Windows 2000 (service pack 4 and higher), HyperTerminal is included. To access it, go to Start > Programs > Accessories > Communications, and click the HyperTerminal icon. When the program starts, type in “PIX.” At the bottom of the box, select COMÂ 1. In Properties, select 9600 bits per second; data bits: 8; parity: none; stop bits: 1; and flow control: none.
If you’re using the console to configure your PIX for the first time, you should see a message that says:
Pre-configure PIX Firewall now
through interactive prompts? [yes]?
Hit the Control-Z keys, and you’ll see the prompt. The “>” sign tells you that you’re in unprivileged mode, and that you can only view your current configuration. In order to change settings, you’ll have to switch to privileged mode. To do this, type “en” at the prompt. (You’ll see the hash symbol “#” when you’re in privileged mode.) It should look like this:
pixfirewall#
Wait a second: We haven’t entered a password yet. To do this, hit Return again to get to the prompt and enter a password.
Configuration Time
Because your router is “out of the box,” it has no default configuration. It doesn’t know its place in the universe, nor does it know what type of traffic you’d like it to forward or restrict. To tell it these things, we’ll go into “configure terminal” mode (or “conf t” for short). At the prompt, enter:
pixFirewall#config t
Now the prompt should look like this:
pixFirewall (config)#
The router, on the other hand, has no configuration (because we cancelled out of the setup). Any time you’d like to see the configuration, type the following at the command prompt:
pixFirewall(config)# wr tÂ
You should see it spit out something like the following:
PIX Version 6.3(3)
interface ethernet0 auto shutdown
interface ethernet1 100full shutdown
nameif ethernet0 outside security0
nameif ethernet1 inside security100
enable password 8Ry2YjIyt7RRXU24 encrypted
passwd 2KFQnbNIdI.2KYOU encrypted
hostname pixfirewall
fixup protocol dns maximum-length 512
fixup protocol ftp 21
fixup protocol h323 h225 1720
fixup protocol h323 ras 1718-1719
fixup protocol http 80
fixup protocol rsh 514
fixup protocol rtsp 554
fixup protocol sip 5060
fixup protocol sip udp 5060
fixup protocol skinny 2000
fixup protocol smtp 25
fixup protocol sqlnet 1521
fixup protocol tftp 69
<— More —>
Hit the space bar to continue, and you should see:
pager lines 24
mtu outside 1500
mtu inside 1500
no ip address outside
no ip address inside
ip audit info action alarm
ip audit attack action alarm
pdm history enable
arp timeout 14400
timeout xlate 3:00:00
timeout conn 1:00:00 half-closed 0:10:00 udp 0:02:00 rpc 0:10:00
h225 1:00:00
timeout h323 0:05:00 mgcp 0:05:00 sip 0:30:00 sip_media 0:02:00
timeout uauth 0:05:00 absolute
aaa-server TACACS+ protocol tacacs+
aaa-server RADIUS protocol radius
aaa-server LOCAL protocol local
no -server location
no snmp-server contact
snmp-server community public
no snmp-server enable traps
floodguard enable
telnet timeout 5
ssh timeout 5
console timeout 0
terminal width 80
Cryptochecksum:d41d8cd98f00b204e9800998ecf8427e
: end
[OK]
pixfirewall(config)#
Assigning a Password
Fresh out of the box, a PIX firewall doesn’t have a password, so let’s assign one now. Type “enable password” and then enter a password. In our example, we’ll use the word “techst0ck.”
pixFirewall(config)# enable password techst0ck
Now we’ll bring up those two interfaces, as out of the box, they’re down.
pixFirewall(config)# interface ethernet0 auto
pixFirewall(config)# interface ethernet1 100full
You can see the status of these interfaces by typing:
pixFirewall(config)# show interfaces
That command will give you this:
interface ethernet0 “outside” is up, line protocol is up
Hardware is i82559 ethernet, address is 0011.92c5.6b92
MTU 1500 bytes, BW 100000 Kbit full duplex
28354 packets input, 2040341 bytes, 0 no buffer
Received 28383 broadcasts, 0 runts, 0 giants
0 input errors, 0 CRC, 0 frame, 0 overrun, 0 ignored, 0 abort
0 packets output, 0 bytes, 0 underruns
0 output errors, 0 collisions, 0 interface resets
0 babbles, 0 late collisions, 0 deferred
0 lost carrier, 0 no carrier
input queue (curr/max blocks): hardware (128/128) software (0/1)
output queue (curr/max blocks): hardware (0/0) software (0/0)
interface ethernet1 “inside” is up, line protocol is up
Hardware is i82559 ethernet, address is 0011.92c5.6b94
MTU 1500 bytes, BW 100000 Kbit full duplex
246 packets input, 29521 bytes, 0 no buffer
Received 246 broadcasts, 0 runts, 0 giants
0 input errors, 0 CRC, 0 frame, 0 overrun, 0 ignored, 0 abort
0 packets output, 0 bytes, 0 underruns
0 output errors, 0 collisions, 0 interface resets
0 babbles, 0 late collisions, 0 deferred
0 lost carrier, 0 no carrier
input queue (curr/max blocks):
hardware (128/128) software
(0/1) output queue (curr/max blocks):
hardware (0/0) software (0/0)
Now that the interfaces are up, it’s time to assign both an inside and an outside IPÂ address. It is between these two addresses that your PIX will permit or deny traffic, so if this step isn’t done correctly, traffic cannot come in or leave your network correctly.
Let’s assume you assign your outside address dynamically (for instance, your ISPÂ automatically assigns you an IP address). To let your ISP autoassign one, type:
pixfirewall(config)# ip address outside dhcp
If there is a DHCPÂ server upstream from you that is properly configured to lease you an IP address, you’ll get a message similar to this one:
Allocated IP address =12.110.110.91, netmask =255.255.252.0, gateway = 12.110.110.1
If this doesn’t work, then you’ll need to manually assign your IP address on ethernet0. If your ISP told you your IP address is, say, 12.110.110.91/24, then you’d type in this:
pixFirewall(config)# ip address
outside 12.110.110.91
255.255.255.0
Once you’ve finished, you’ll need to set the IP addresses of the inside (ethernet1) interface as well.
pixFirewall(config)# ip address inside 10.1.1.1 255.255.255.0
The 10.x.y.z address we choose is a private IP address (also called a non-routable IP). We could’ve a chosen a wide range of IP addresses (10.0.0.0 through 10.255.255.255; 172.16.0.0 through 172.31.255.255; or 192.168.0.0 through 192.168.255.255), but we arbitrarily chose 10.1.1.0.24.
If everything goes according to plan, type:
pixFirewall(config)# show ip address
You’ll get something like this:
System IP Addresses:
ip address outside 12.110.110.91
255.255.252.0
ip address inside 10.1.1.1
255.255.255.0
Current IP Addresses:
ip address outside 12.110.110.91
255.255.252.0
ip address inside 10.1.1.1
255.255.255.0
Ethernet Considerations
In order for our inside (Ethernet1) and outside (Ethernet0) interfaces to work, they need to be configured properly with global addresses, NATÂ (network address translation), and routing. Without these, your PIX is just a box with two IP addresses and no way to translate inbound traffic to your public IP or public traffic to your internal addresses.
The PIX 501 is the smallest model from Cisco, so we’ll assume that your network isn’t too large. In this example, we’re only going to NAT your one public IP. Theoretically, you can NAT 254, although you’re limited to 10 devices unless you buy an upgrade license.
If you use DHCP, then you’ll need to configure the PIX to route outgoing traffic. Since it’s DHCP, we don’t really know where that is, as our ISP may very well decide to change our IP address without telling us. In this case, we’ll need to type in the following line:
pixfirewall(config)# ip address
outside dhcp setroute
If all went well, you should see something like this:
Allocated IP address =
12.110.110.91, netmask =
255.255.252.0, gateway =
>12.110.110.1
If all didn’t go as planned, you’ll have to manually add your route:
pixFirewall(config)# route outside
0.0.0.0 0.0.0.0 12.110.110.1
To double-check that route, type:
pixFirewall(config)# sh route
And, in the case of our first DHCP example, you should get something similar to the following:
pixfirewall(config)# sh route
outside 0.0.0.0 0.0.0.0
12.110.110.1 1 DHCP static
outside 12.110.110.0
255.255.252.0 66.215.246.91 1
CONNECT static
inside 10.1.1.0 255.255.255.0
10.1.1.1 1 CONNECT static
Now that the PIX knows what to do with outgoing traffic (send it upstream to another router), we now need to give it specific instructions on how to translate traffic between the two interfaces. Use this command to make that happen:pixfirewall(config)# nat (inside) 1
10.1.1.0 255.255.255.0
pixfirewall(config)# global
(outside) 1 interface
If you did this correctly, the second line will give the message:
outside interface address added to PAT pool
Now your PIX has been configured to translate traffic between your public (12.110.110.91) address and your private 10.1.1.0/24 network. The only thing left now is to configure the DHCP server on the internal interface. Doing so will allow the PIX to automatically assign IP addresses to those on your network; similar to the way an ISP automatically assigns IPs to its users. To do this, follow these instructions:
pixfirewall(config)# dhcpd address 10.1.1.32-10.1.1.63 inside
pixfirewall(config)# dhcpd dns 4.2.2.1 4.2.2.2
pixfirewall(config)# dhcpd lease 3600
pixfirewall(config)# dhcpd ping_timeout 750
pixfirewall(config)# dhcpd enable inside
One note on the DHCP server configuration above is that you may have to obtain DNSÂ numbers from your provider. If you don’t have those numbers readily available or aren’t sure what to do, you can use 4.2.2.1 and 4.2.2.2. The only problem is that these numbers might not quickly resolve your Web pages as your own ISP, so you should consider using numbers your ISP provides.
If all has gone well up to this point, computers that are plugged into the back of your PIX (in slots 1 through 4) should have no problem getting on the Internet. In fact, if you go to any of these computers and (assuming you’re running Windows 2000 or Windows XP) go to Start>Run and type “cmd,” you can test the connection. At the prompt, type:
C:ipconfig
Your IP address, which should lie somewhere between 10.1.1.32 and 10.1.1.63, should be displayed if your network settings were configured to obtain an IP automatically. If an IP address showed up, type:
C:ping 10.1.1.1
And you should get a response similar to this:
Pinging 10.1.1.1 with 32 bytes of data:
Reply from 10.1.1.1: bytes=32 time<10ms TTL=255
Reply from 10.1.1.1: bytes=32 time<10ms TTL=255
Reply from 10.1.1.1: bytes=32 time<10ms TTL=255
Reply from 10.1.1.1: bytes=32 time<10ms TTL=255
Ping statistics for 10.1.1.1:
Packets: Sent = 4, Received = 4, Lost = 0 (0% loss),
Approximate round trip times in milli-seconds:
Minimum = 0ms, Maximum = 0ms, Average = 0ms
Saving Your Configuration to Memory
If all went well, and your DNS is properly working, you should be able to open your browser and surf the Internet as usual. If that’s the case, let’s proceed to saving the running configuration to memory.
pixFirewall(config)# wr m
Building configuration…
Cryptochecksum: 2083012d dc56002e ebb9e5d3 f405a373
[OK]
Security Considerations
At this point, the question often arises, “How secure am I?” The answer: Not nearly as secure as you’ll ultimately want to be. Thanks to Cisco’s Adaptive Security Algorithm ( ASA), the firewall settings are similar to the default settings of a home Linksys or Netgear router: All outbound traffic is permitted (unless expressly prohibited), and all inbound traffic is denied (unless expressly permitted). Your network will no doubt need much more security than this, so you will need to either read through Cisco’s documentation or hire a networking consultant.
If you’re curious about Cisco’s ASA settings, type in “wr t” from the command line and you’ll see something like this:
Building configuration…
: Saved
:
PIX Version 6.3(3)
interface ethernet0 auto
interface ethernet1 100full
nameif ethernet0 outside security0
nameif ethernet1 inside security100
In the end, the “security0” and “security100” both specify the security level of each interface. Cisco’s ASA allows traffic to pass from trusted (100) to untrusted (0), but not the reverse. With our configuration, internal traffic can pass freely to the outside because its security level is higher.If you host a Web server, and most, if not all, of your traffic is coming from the outside, how do you let that traffic in? The answer lies with Cisco’s use of Access Control Lists (ACLs). An in-depth look at how ACLs work is beyond the scope of this article, but Cisco’s Using PIX Firewall Commands can help you configure the firewall. And if you’re really stuck, consider hiring a professional network administrator.
At best, poorly configured ACLs can mean sporadic connectivity; at worst, it can mean huge security breaches in your network. What’s especially dangerous for new network administrators is the temptation to do things a certain way because “it works.” In a desperate effort to make things work, they often create ACLs that are too permissive, leaving open big holes for malicious hackers or crackers to exploit.
Snort Reports with SnortALog
by Brian on Dec.27, 2005, under Networking, OpenBSD
SnortALog v2.4.0 is a really nice Snort logfile reader/parser/perl script written by Jeremy Chartier. Thank you Jeremy! It’s an *incredible* piece of work! Get a copy from his website. I installed mine on OpenBSD-3.8-STABLE, but I also needed the p5-GD-Graph package from the ports tree.
 $ cd /usr/ports/graphics/p5-GD-Graph

$ sudo make install
Then, I made the script to run SnortALog, and set it to run from root’s crontab.
Here’s a screenshot of the HTML output.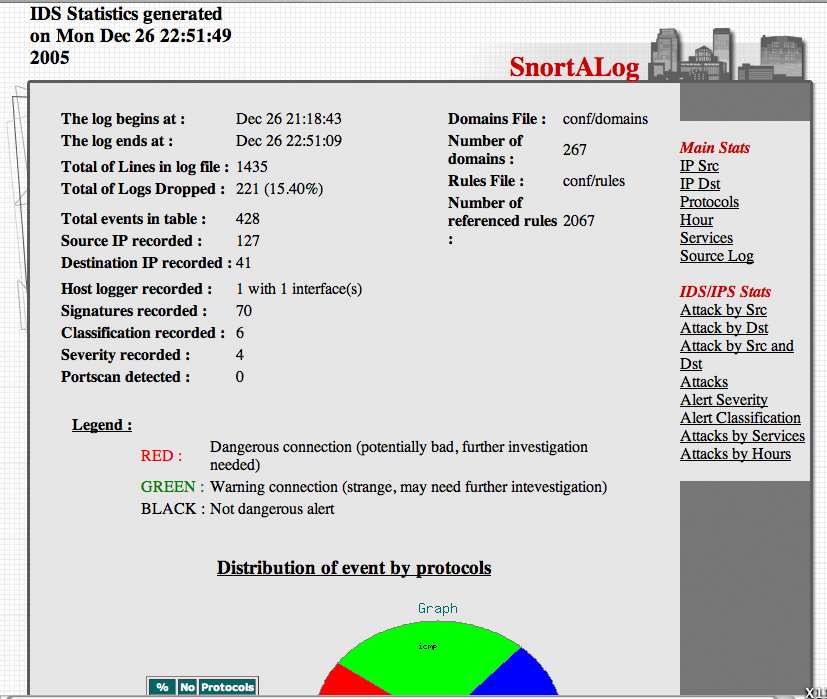
Graphing packet traffic with pf & pfstat
by Brian on Dec.21, 2005, under Networking, OpenBSD
Getting a good visual representation of your network traffic has never been easier. We use OpenBSD for most of our firewalling applications, and for VoIP/VPN solutions. As a result, we (as well as our customers) need to closely track the bandwidth utilization of some of the endpoints for quality of (VoIP) service reasons. RRDTool and MRTG are both very excellent tools, but what to do when snmp is not an option? Pfstat, available in the OpenBSD ports tree, solves this problem, and is *considerably* easier to install and configure.
First, install pfstat.
$ cd /usr/ports/net/pfstat

$ sudo make install
Now, set it up.
you need to create a few files first.
$ sudo touch /var/log/pfstat

$ sudo touch /etc/pfstat.conf
Now, set up the /etc/pfstat.conf file you just created.
$ sudo vi /etc/pfstat.conf
Here’s an example pfstat.conf I found on benzedrine.cx, (the homepage of the author of pf & pfstat) and modified just slightly.
Thank you, Mr. Hartmeier. Your work is amazing.
Speaking of Pf, we need to edit the packet filter configuration, to set the log interfaces.
$ sudo vi /etc/pf.conf
Now, find your interface names. (Mine are $ext_if=rl0 and $int_if=fxp0)
So, I added the following lines to the /etc/pf.conf
set loginterface rl0(It has been pointed out that this is incorrect.
set loginterface fxp0
The last interface listed is the one that will get used. Thanks, Jon.)
Fetch the new packet filter configuration:
$ sudo pfctl -f /etc/pf.conf
Now, edit root’s crontab to run pfstat and update your graphs.
 $ sudo su

# crontab -e -u root
and add the following two lines to it:
* * * * * /usr/local/bin/pfstat -q >>/var/log/pfstat

*/5 * * * * /usr/local/bin/pfstat -c /etc/pfstat.conf -d /var/log/pfstat >/dev/null
Hold “Shift” and hit “ZZ” to save and exit root’s crontab.
To force the creation of the graph images, run this:
$ sudo /usr/local/bin/pfstat -q >>/var/log/pfstat

$ sudo /usr/local/bin/pfstat -c /etc/pfstat.conf -d /var/log/pfstat >/dev/null
Now, you just need an HTML document to display your nifty new graphs.
Here’s the one I use.
Save it to /var/www/htdocs/traffic_stats.html, and start up apache:
$ sudo apachectl start
and check out your traffic:
http://your.web.server/traffic_stats.html
.
