Tag: OpenBSD
The WordPressDash – It’s really too easy…
by Brian on Oct.22, 2005, under Mac OSX
This was posted using WordPressDash version 0.3.
It was written by the obviously talented Paniris Web development
It’s a very cool must-have widget for OS X 10.4. (aka. Tiger)
So, making use of the very cool Expose, (which gives the overlayed panel of tools you see in the screenshot below)
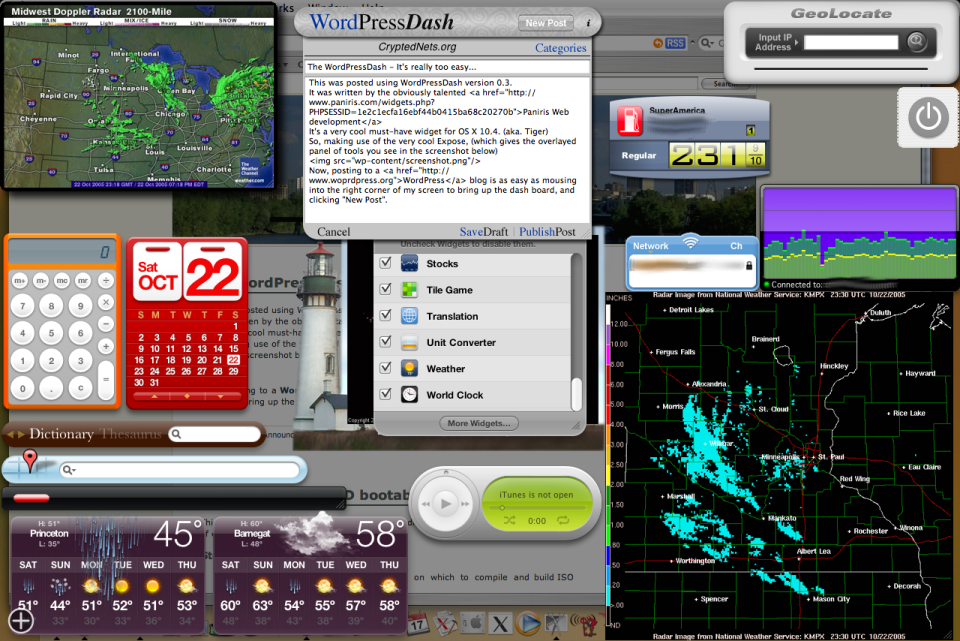
Now, posting to a WordPress blog is as easy as mousing into the right corner of my screen to bring up the dash board, and clicking “New Post”.
Thank you, Paniris, for your very excellent widget!
Making an OpenBSD bootable RAMDISK_CD
by Brian on Oct.14, 2005, under OpenBSD
This is a work in progress, do not follow these directions without having the capability of continuing on your own.
Steps:
- You need a working openbsd machine on which to compile and build ISO images.
- Make a directory in which to keep the cd’s contents, such as /home/livecd or
similar. If you can make this a separate partition, so you can boot it for testing, all the better. - Untar base37.tgz and etc37.tgz in this directory.
- Make sure the kernel sources (/usr/src/sys) are installed on the machine.
- cd into /usr/src/sys/arch/i386/conf and copy the kernel config file GENERIC to CDBOOT or similar.
- edit the file CDBOOT. Replace the include of ../../conf/GENERIC with the contents of that file.
- make the following changes to CDBOOT:
- add the options RAMDISK_HOOKS and MINIROOTSIZE=3560 to support ramdisks
- comment out the line config bsd swap generic, as there will be no disk to swap to
- add the line config bsd root on cd0c to allow for / on the cd
- run the command “config CDBOOT”
- cd into ../compile/CDBOOT and run make depend and then make
- copy this kernel into /home/livecd
- edit the file /usr/src/distrib/i386/common/Makefile.inc, replacing the lines
        strip ${.OBJDIR}/boot
        strip -R .comment ${.OBJDIR}/boot
with the line
strip --strip-all -R .comment -K cngetc bsd.strip
- cd into /usr/src/distrib/i386/floppies
- create the directory CDBOOT as a copy of ramdisk_cd
- edit the makefile in CDBOOT, changing the line RAMDISK=RAMDISK_CD to RAMDISK=CDBOOT
- do a make in /usr/src/distrib/crunch and then /usr/src/distrib, to setup some prerequisites, then do a make in /usr/src/distrib/i386/CDBOOT. copy cdrom35.fs to /home/livecd/boot.img, this is the image you need to make the cd properly bootable.
- change /etcs to make booting work right
- Edit the CD version of /etc/rc to mount the floppy on /etc, then run
/etc/rc off the floppy or run the installer if it doesn’t exist. - edit the floppy version of /etc/rc to mount the appropriate filesystems.
- edit the CD version of /etc/fstab to include the cd and the floppy
- edit the floppy version of /etc/fstab to include the cd and floppy, and
all ramdisk filesystems
- Edit the CD version of /etc/rc to mount the floppy on /etc, then run
- Create an etc floppy, or include the installer script and related files.
- Create the ISO image using the command: mkisofs -b cdrom37.fs -c boot.catalog -R -v -o OBSDCD.iso /home/livecd
Installing OpenBSD onto a 256mb CompactFlash Card via serial cable is fun.
by Brian on Oct.14, 2005, under OpenBSD
So I’ve gotten this really *sweet* OEM firewall appliance on demo….
And I thought I’d put OpenBSD-3.7-STABLE onto it.
No hard drive or VGA port, just a com0, 256mb CompactFlash and 512mb of RAM…
Hmmm….
Serial console time….
yup. i guess i got the cable. ;P
So… I have my serial cable, plugged into the DB9 on the demo unit, and also to com0 on my laptop.
no dice. (or console redirection….) #$$%#@^@!!@#%$#!@
## Screw-driver time ##
Ok. I’ve gotten the cover off of this thing, and installed the not-supplied-but-overnight-shipped VGA cable.
(what are they, like $.59 in bulk? )
Monitor plugged in, CDROM drive perched precariously over the open system, USB keyboard plugged in, READY.
Into the BIOS, re-direct the console to com0, save and exit.
## End Screw-driver time ## (for now)
So, just to get an idea of what we’re working with, I installed a simple 3.7-STABLE system.
The 256mb compact flash was recognized as wd0, and so I installed to it as if it were a hard disk.
{swap} 32m
/ {remainder} ~209mb
I installed the following packages:
bsd
base37.tgz
etc37.tgz
misc37.tgz
comp37.tgz (just ’cause I wanted to see if it would fit)
It all fit with ~9mb left over. {cool} Obviously not very useful, as a noisy log would fill the disk rather quickly.
So, let’s build a bootable RAMDISK_CD and boot it from the flash.
We need a similar 3.7-STABLE x86-based build host, preferrably with plenty of drive space, for making the bootable RAMDISK_CD.
Think I’ll go set that up… (more later)
The OpenBSD Anti-Spam mailserver How-To
by Brian on Sep.24, 2005, under OpenBSD
Piles of valuable information, a must read for any mail server admin.
http://www.flakshack.com/anti-spam
This *flat-out* cracked me up… :)
by Brian on Sep.24, 2005, under Amusement, OpenBSD
Taken directly from the OpenBSD FAQ
The standard OpenBSD kernel configuration (GENERIC) is designed to be suitable for most people. More people have broken their system by trying to tweak their kernel than have improved system operation. There are some people that believe that you must customize your kernel and system for optimum performance, but this is not true for OpenBSD. Only the most advanced and knowledgeable users with the most demanding applications need to worry about a customized kernel or system.
Some reasons you might want or need to build a custom kernel:
Some reasons why you should not build a custom kernel:
You do not need to, normally.
You will not get a faster system.
You are likely to make a less reliable machine.
You will not get any support from developers.
You will be expected to reproduce any problem with a GENERIC kernel before developers take any problem report seriously.
Users and developers will laugh at you when you break your system.
Custom compiler options usually do a better job of exposing compiler problems than improving system performance
Nice bit of writing, guys. Keep up the good work! (and thanks for the help)
It made me chuckle…
by Brian on Sep.24, 2005, under Amusement, OpenBSD
5.11.3 – My IPv6-less system doesn’t work!
Yes.
Please do not make modifications to the base system that you don’t
understand the implications of.
One “little” change in the kernel can have very large impact to the
entire rest of the system.
Please re-read this.
Creating a self-signed SSL certificate for Apache
by Brian on Aug.06, 2005, under Mac OSX, OpenBSD
To support https transactions in Apache, you will need to generate an RSA certificate.
# openssl genrsa -out /etc/ssl/private/server.key 1024
Or, if you wish the key to be encrypted with a passphrase that you will have to type in when starting servers
# openssl genrsa -des3 -out /etc/ssl/private/server.key 1024
The next step is to generate a Certificate Signing Request which is used
to get a Certifying Authority (CA) to sign your certificate. To do this
use the command:
# openssl req -new -key /etc/ssl/private/server.key -out /etc/ssl/private/server.csr
This server.csr file can then be given to Certifying Authority who will sign the key.
You can also sign the key yourself, using the command:
# openssl x509 -req -days 365 -in /etc/ssl/private/server.csr -signkey /etc/ssl/private/server.key -out /etc/ssl/server.crt
Simple ethernet tracker script
by Brian on Aug.05, 2005, under Mac OSX, OpenBSD
Need to find an ethernet port on a very populated switch?
Run this on your powerbook, plug into the jack, and Voila!
The port on the switch will flash, allowing you to find it without
replacing the dead batteries in your toner and tracker.
#!/bin/sh
while true; do
sudo ifconfig en0 down
sleep 1
sudo ifconfig en0 up
sleep 1
done
Windows XP to OpenBSD VPN Configuration
by Brian on May.13, 2005, under Networking, OpenBSD, Windows Info
Re: OpenBSD VPN
From: Peter Grießl (griesslihs.ac.at)
Date: Thu Feb 17 2005 – 02:29:22 CST
Messages sorted by: [ date ] [ thread ] [ subject ] [ author ]
——————————————————————————–
Mark Maxey wrote:
>
> My incoming hosts will be a mixture of Windows XP/2000 and Linux
> clients, but knowledgeable users. Preferably this solution would be
> able to use a free client or use the ipsec/vpn capabilities built into
> MS windows.
>
Hi Mark,
use IPsec – Windows 2000/XP has builtin support for IPsec, no need for any
extra client software.
The only magic is the configuration; in theory one can configure IPsec
using clicksy graphical interfaces (Management Console …), practically
you cannot. But tunnel setup is perfectly possible using a simple
batch file and the MS tools ipsecpol.exe (W2k) or ipseccmd.exe (XP).
for certificates, we use http://www.klake.org/~jt/mkca
The clients only need to install the *.p12 certificate file (double-click
installation does not work, you have to go through MMC – Certificate SnapIn
– right-click Personal – All Tasks – Import – Wizard – browse to the *.p12
file – password – change the certificate store to “Automatically select
the certificate store based on the type of certificate” – next – complete –
finish
XPSP2: start testing with firewall disabled (note: tunnel works ok with
firewall enabled, only problems using icmp – XPSP2-bug)
Personal Firewalls (Norton, McAfee): some work together with IPsec, some
don’t (some have to be completely deinstalled to make IPsec work, disabling
does not help)
Users must have administrative rights to set up the IPsec-tunnel on 2000/XP.
So, here are the batchfiles we use:
START_VPN.BAT (call with Samba-username and Samba-password as arguments)
————-
echo off
set VPNPATH=c:ihsvpn
title please wait …
rem we have two ipsec gateways, one batchfile
set WLANGW=143.130.40.1
set DMZGW=143.130.36.2
set USER=%1
set PASS=%2
rem 2000 or XP ?
ver | findstr 2000
if not errorlevel 1 goto 2000
ver | findstr XP
if not errorlevel 1 goto XP
goto OUT
:2000
set TOOL=ipsecpol
goto OSOK
:XP
set TOOL=ipseccmd
:OSOK
rem disable and delete old ipsec policy (sometimes required,
rem user did not call stop_vpn.bat last time)
%VPNPATH%%TOOL% -w REG -p IHSVPN -r NB2LAN -y
%VPNPATH%%TOOL% -w REG -p IHSVPN -r LAN2NB -y
%VPNPATH%%TOOL% -w REG -p IHSVPN -r NB2DHCP -y
%VPNPATH%%TOOL% -w REG -p IHSVPN -r DHCP2NB -y
%VPNPATH%%TOOL% -w REG -p IHSVPN -o
rem Which gateway is accessible?
ping -n 3 %WLANGW% | find “TTL” > NUL
if not errorlevel 1 goto WLAN
ping -n 3 %DMZGW% | find “TTL” > NUL
if not errorlevel 1 goto DMZ
goto EXIT
:WLAN
set IPSECGW=%WLANGW%
goto DOIT
:DMZ
set IPSECGW=%DMZGW%
:DOIT
REM all traffic to our net should go through the ipsec tunnel
set ROUTE=143.130.32.0/255.255.240.0
REM find client’s ip address
set ipaddr=
for /F “tokens=2 delims=:” %%f in (‘ipconfig ^| findstr dress’) do set
ipaddr=%%f
if “%ipaddr%”==”” goto EXIT
REM trim space
set ipaddr=%ipaddr:~1%
REM DHCP-server?
set dhcp=
for /F “tokens=2 delims=:” %%f in (‘ipconfig /all ^| findstr /C:”DHCP
Server”‘) do set dhcp=%%f
REM trim space
set dhcp=%dhcp:~1%
REM create IPSEC policy and activate tunnel
%VPNPATH%%TOOL% -w REG -p IHSVPN -r NB2LAN -t %ipsecgw% -f 0=%ROUTE% -n
ESP[SHA,3DES]P -a CERT:”C=AT, S=Austria, L=Vienna, O=Institute for Advanced
Studies, OU=IHS, CN=Institute for Advanced Studies”
%VPNPATH%%TOOL% -w REG -p IHSVPN -r LAN2NB -t %ipaddr% -f %ROUTE%=0 -n
ESP[SHA,3DES]P -a CERT:”C=AT, S=Austria, L=Vienna, O=Institute for Advanced
Studies, OU=IHS, CN=Institute for Advanced Studies”
if %dhcp%==~1 goto activate
%VPNPATH%%TOOL% -w REG -p IHSVPN -r NB2DHCP -t %ipsecgw% -f
0:68=%dhcp%:67:UDP -n PASS
%VPNPATH%%TOOL% -w REG -p IHSVPN -r DHCP2NB -t %ipaddr% -f
%dhcp%:67=0:68:UDP -n PASS
:activate
%VPNPATH%%TOOL% -w REG -p IHSVPN -x
REM negotiate and check IPSEC
rem ping the samba server to setup and check the ipsec tunnel
ping -n 4 143.130.45.10 < ======= doesn't work with
XPSP2 FW enabled
nbtstat -A 143.130.45.10
ping -n 2 143.130.45.10 | find "TTL" <======= ................
if not errorlevel 1 goto MOUNT
%VPNPATH%%TOOL% -w REG -p IHSVPN -r NB2LAN -y
%VPNPATH%%TOOL% -w REG -p IHSVPN -r LAN2NB -y
%VPNPATH%%TOOL% -w REG -p IHSVPN -r NB2DHCP -y
%VPNPATH%%TOOL% -w REG -p IHSVPN -r DHCP2NB -y
%VPNPATH%%TOOL% -w REG -p IHSVPN -o
goto EXIT
REM mount network drives (if you need this)
:MOUNT
rem mount your samba shares (net use .... %USER% %PASS%)
goto OUT
:EXIT
echo Something went wrong, sorry!
:OUT
exit
STOP_VPN.BAT
------------
echo off
set VPNPATH=c:ihsvpn
title please wait ...
rem unmount samba shares
rem net use .... /d
rem 2000 or XP ?
ver | findstr 2000
if not errorlevel 1 goto 2000
ver | findstr XP
if not errorlevel 1 goto XP
goto EXIT
:2000
set TOOL=ipsecpol
goto OSOK
:XP
set TOOL=ipseccmd
:OSOK
rem disable and delete ipsec policy
%VPNPATH%%TOOL% -w REG -p IHSVPN -r NB2LAN -y
%VPNPATH%%TOOL% -w REG -p IHSVPN -r LAN2NB -y
%VPNPATH%%TOOL% -w REG -p IHSVPN -r NB2DHCP -y
%VPNPATH%%TOOL% -w REG -p IHSVPN -r DHCP2NB -y
%VPNPATH%%TOOL% -w REG -p IHSVPN -o
:EXIT
exit
here are the OpenBSDs (3.6) config files:
/etc/isakmpd/isakmpd.conf
# --- Global options
[General]
Retransmits= 5
Exchange-max-time= 120
Listen-on= 143.130.40.1
Shared-SADB= Defined
Renegotiate-on-HUP= Defined
# --- X.509 certificate locations
[X509-certificates]
CA-directory= /etc/isakmpd/ca/
Cert-directory= /etc/isakmpd/certs/
Private-key= /etc/isakmpd/private/local.key
# --- IKE Phase 1 & 2
[Phase 1]
Default= Client-phase1
[Phase 2]
Passive-Connections= Client-phase2
[Client-phase1]
Phase= 1
Transport= udp
Local-address= 143.130.40.1
Configuration= Default-main-mode
ID= My-ID
[My-ID]
ID-type= FQDN
Name= ipsecgw.ihs.ac.at
[Client-phase2]
Phase= 2
ISAKMP-peer= Client-phase1
Local-ID= All-networks
Remote-ID= Unknown-address
# --- Network details
[All-networks]
ID-Type= IPV4_ADDR_SUBNET
Network= 0.0.0.0
Netmask= 0.0.0.0
[Unknown-address]
ID-Type= IPV4_ADDR
Address= 0.0.0.0
# --- Main and quick mode transforms
[Default-main-mode]
DOI= IPSEC
EXCHANGE_TYPE= ID_PROT
Transforms= 3DES-SHA-RSA_SIG
[3DES-SHA-RSA_SIG]
ENCRYPTION_ALGORITHM= 3DES_CBC
HASH_ALGORITHM= SHA
AUTHENTICATION_METHOD= RSA_SIG
AUTHENTICATION_ALGORITHM= HMAC_SHA
Life= Phase1-Lifetime
[Phase1-Lifetime]
LIFE_TYPE= SECONDS
LIFE_DURATION= 3600,60:86400
/etc/isakmpd/isakmpd.policy
KeyNote-Version: 2
Authorizer: "POLICY"
Licensees: "DN:/C=AT/ST=Austria/L=Vienna/O=Institute for Advanced
Studies/OU=IHS/CN=Institute for Advanced Studies"
Conditions: app_domain == "IPsec policy" &&
esp_present == "yes" &&
remote_id_type == "ASN1 DN" &&
esp_enc_alg != "null" -> “true”;
Hope that helps!
Greetings from cold Vienna,
Peter Griessl, griesslihs.ac.at
